Wednesday, October 31, 2012

How to work with resin


If you have seen Riusuke Fukahori's ambered almost real goldfishes, I'm very sure you've also been amazed. He works patiently (and hazardously) with resin. So, his work inspired me to experiment with resins and integrate the material with my works.

Resin is a clear viscous liquid that hardens to a glass-like material through a chemical reaction with a catalyst. There are many types of resin and its applications, better search the web for proper terms and guidance.

If it's your first time to handle a material like this, I suggest that you first search a lot of info on Google and Youtube before making something ambitious. Although I've read a lot of info regarding resin, my first attempts were not very successful. It takes a LOT of patience and couple of tries before getting the right process for your own project. 

Even if it looks fun to do, be forewarned that resin is a VERY TOXIC substance. Wear proper safety tools and protection like respirators, gloves, aprons, etc. Take precautionary measures as well: work only outdoors as it gives off a very odorous/toxic smell, stay away from flammables. THIS SUBSTANCE IS NOT FIT FOR CHILDREN.


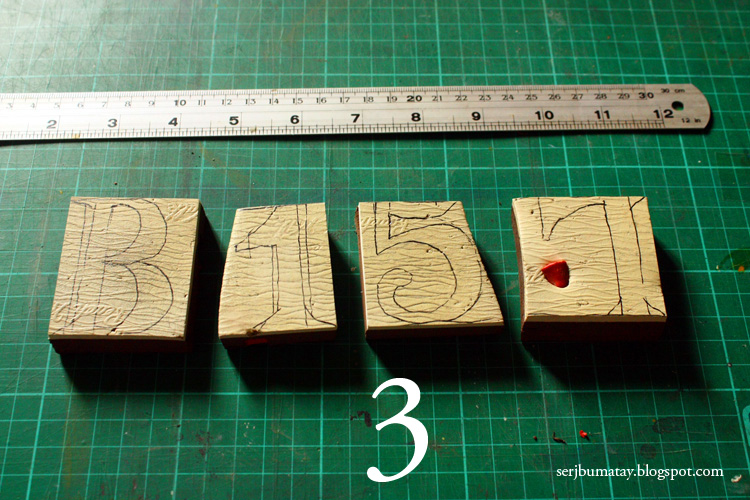
I was thinking of a 3D floating illustration cast in resin for an exhibit so I made them in pieces, 
to be layered later in batches to the resin mold. 


 I painted the back of the pieces with white acrylic and latex paint because when you dip the paper in resin, it will look transparent. 


Collect all your materials first before pouring in the resin.
I collected dried seeds and little flowers then colored them with acrylic for this project.


I got my gallon of polymer resin (clear cast) at Polymer Products Phils. (local chemical store with branches around metro, check their website) which costs Php7++ per gallon with MKEP catalyst. Quite expensive so make the most of it. A costlier but less odorous version (but still toxic, I think 350ml) can also be bought from Diovir with the brand name Easy Cast. Check for proper proportions on the web but sometimes they're not accurate enough. If you put less catalyst, it won't cure and stays sticky forever. When you put more catalyst, it cures very quickly, cracks, and turns very hot. 

The proportion I used for resin + catalyst was based on trial and error (you'll see later in the photos): for every cup (8oz.) of resin, I put 1 ml of catalyst (use a small syringe). This proportion is good enough for projects this size or smaller molds, it cures just at the right time: it gels around 15-30mins then harden after more than an hour and totally cured after a day. Some plastic cups can melt with curing resin (see photo above) so find sturdier cups. 


In the photo above, I placed the first batch of incorrect resin mixture into a glass bowl mold (I bought this bowl for this project only, don't use this for food after), which cured a bit faster than I thought so I made another mixture to pour in quickly to even the batch. Btw, mix the resin + catalyst thoroughly - it will turn yellowish after a while, but clears when cured. Also, don't worry about bubbles, it will rise up eventually.


When the first batch lightly cured and in a gel-like stage, I placed some seeds, making it float. To avoid bubbles on objects you place, dip first the objects in a mixture then gradually place it in the mold with a stick.


I tried to color some mixture with oil paint and acrylic. The shelf life of a mixed resin is around 15-30 mins. with covered mold. Mixed resin doesn't cure in open air, so cover your mold as much as you can.


The colored mixture looks like a blob when dropped. 


The paint pigments scattered to a mess after a while.


My first failed attempt, I had to scoop it out quickly for another batch. I mixed in too much catalyst. I got so excited about the project so I messed up the correct mixture proportions. 


Almost successful attempt, if not for some bubbles trapped in the objects and some paint bleeding.


Unfortunately, this project was unsuccessful. I wasn't patient enough to get through each layer. 
So, I just made another artwork for the exhibit :-)


***

If you like this post, please comment 

Or gift yourself and loved ones with lovely goodies here
I'll appreciate it very much, thank you.

Plus, please check out my youtube videos and sub my channel:


Sunday, October 28, 2012

Forgotten but Loved still


I got an email from an art lover who asked me if a certain painting that he found hanging in an antique thrift shop in Bangkal, Makati was authentically mine. He described the painting on wood as whimsical, with a tattooed man trying to reach over for some things and a bag with the word shop. There was no picture attached on the email and I could not remember this painting at all, but somehow it did sound familiar. I requested for a photo and replied some clues about my usual works. The clues did match.

I was thinking maybe someone tried to rip-off my works and labelled my name then sold it around. But why me?! when there are more talented artists with big names around! Ripping-off unheard-of but existing artists, is this the new modus in art? Feels kinda flattering, but I don't think it's logical at this very early point of my artistic career, and no, not me please, there are much better than me out there! I'm just glad it wasn't the case, haha.

Meanwhile, I looked in my digital and printed files for photos and documentation. I could not find any matches and I still can't remember the painting described. How can I just forget this painting, when I treat all of my works like my children-I do remember each one of them. I got so intrigued-how did it end up in a flea shop? When most of my past works are either given to a friend, piled in our house, or "recycled" for new ones? I have never seriously sold a painting in the past as far as I know.

After several days, I finally got the photo. I was in shock when I saw the painting, it was indeed mine. Every memory I had with the painting suddenly rushed in. Having not seen for several years and looking at it now makes me appreciate it more. It was made when I was inspired by Japanese art, spontaneous or chance painting, and stamping, hence the "woodblock" style tweaked in Filipino theme: our eternal quest for one true identity.


The photo above shows the details of the painting pasted at the back with our past apartment address for more than ten years and now nonexistent phone numbers. I think this is the last and the "transitional" painting I made in that apartment, then we finally moved to our own house after most of us graduated. This is probably the reason why I completely forgot about my poor painting. 


I think I made this piece for the Asean Art Awards, obviously it wasn't successful on that competition but I wonder how it made through the hands of a couple. I can't remember if I gave it to them or how and why did I forget to claim it afterwards, I don't have any clues. I value every contest piece I make because I worked and thought hard for them.

What if the art lover didn't see my painting and inform me about it? I could have forgotten this work forever! What if he didn't get it away from the thrift shop? It might have fallen on the wrong hands and kept me from it! I am very grateful that he gave me the chance to see this painting again, and finally wrote my signature, like blessing a lost child with a name and an identity.


Friday, October 26, 2012

How to recycle your flip flops


There are so many things you can do with rubber foam, a material used on flip-flops. Among them are rubber stamps, a floating toy boat, or maybe some puppets. I made some letter blocks. 

Here's a tutorial in making letter blocks from worn flip-flops:


1. Thoroughly clean your flip-flop. Then remove the sling bands with a cutter, set them aside for recycling.


2. Draw or trace some letters with a pen. If you are having a hard time here's a tip: first, print some big letters on paper, then lay them out over to the piece. Trace with your favorite pen, then enjoy some sandwich.


3. Cut the letters separately in blocks so you can cut them easier one by one.


4. Here's the tricky part: cutting each letter with the rubber foam is quite hard especially the curved part. I suggest cutting their outlines first with x-acto knife or cutter. Always be careful when using these sharp tools. Take your time. Then use some carving tools to scoop out the "fillers." Don't worry if you carve them a little unevenly, it's part of the rustic look.


5. Once you're done cutting, you can sand the surface a little to smoothen and clean. You may also color if you want. Use them to label your mailbox, pet house, storage, or wishing board.


Congrats! You've made mother earth a tiny bit happier, a step at a time.


***

If you like this post, please comment

Or gift yourself and loved ones with lovely goodies here
I'll appreciate it very much, thank you.

Plus, please check out my youtube videos and sub my channel: